Showing posts with label Blogspot. Show all posts

Sunday, 8 January 2017

How to Set Adsense ads between blog title and text (post) in blogspot

Add Adsense code below blog title as per the procedure provided in this post:
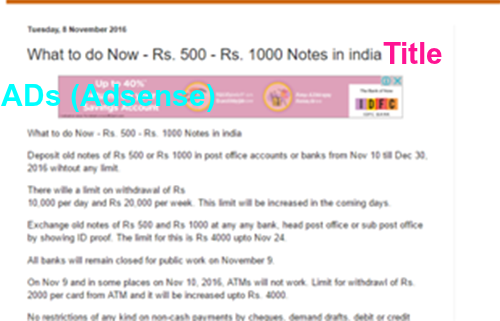

Adsense Ad blog title adsense


Generating Adsense Code

1.       Sign-in to your Adsense account.
2.       Click on 'Content'  then 'Ad Units' then '+New Ad Unit'.
3.       Provide name of Ad Unit.
4.       Select Ad Size
·      Responsive (Automatic Size)
·      Leaderboard (728x90 : Width x Height))
·      Large Rectangle (336x280)
·      Medium Rectangle (300x250)
·      Large Skyscraper (300x600)
·      Large Mobile Banner (320x100)
5.       Ad type
·      Text and Display Ads
·      Display Ads only
·      Text Ads only
6.       Text Ad Style (Set Text Ad Style as per your requirement)
7.        Create New Custom Channel (For grouping your Ad  Units as per its size or its placement in your page or its color)
8.       Backup Ads (To show ads from other  source when google do not show targeted ads)
9.       Now you will get Ad Code as provided below:
<script async src="//pagead2.googlesyndication.com/pagead/js/adsbygoogle.js"></script>
<!-- fdcashback-below title -->
<ins class="adsbygoogle"
     style="display:block"
     data-ad-client="ca-pub-11111111111111"
     data-ad-slot="111111111"
     data-ad-format="auto"></ins>
<script>
(adsbygoogle = window.adsbygoogle || []).push({});
</script>

10.   This code will not work in BlogSpot.com. You need to parse it before using it. Use any online parse tool to do so. After parsing the code, Now above code will look like as follow:
&lt;script async src=&quot;//pagead2.googlesyndication.com/pagead/js/adsbygoogle.js&quot;&gt;&lt;/script&gt;
&lt;!-- fdcashback-below title --&gt;
&lt;ins class=&quot;adsbygoogle&quot;
     style=&quot;display:block&quot;
     data-ad-client=&quot;ca-pub-111111111&quot;
     data-ad-slot=&quot;7207018688&quot;
     data-ad-format=&quot;auto&quot;&gt;&lt;/ins&gt;
&lt;script&gt;
(adsbygoogle = window.adsbygoogle || []).push({});
&lt;/script&gt;

Inserting Adsense Ad code into blogspot
11.   Open blogger and select your blog
12.   Click on Template
13.   Click on Edit HTML
14.   click anywhere in the html code, Take care - Do not delete any text in html code
15.   Then 'Control F' for searching
16.   Search <data:post.body/>
17.   There may be more than one <data:post.body/>
18.   Just leave first one and choose second one and paste parsed code above <data:post.body/>
19.   Save template.
After saving blogger template, you can see adsense ads below your title of the each post.

Above mentioned procedure can be used for setting ads from other advertisers like Chitika, Infolink etc.

Tuesday, 3 March 2015

Create Sitemap for blogger / blogspot


Go to following link for creating sitemap for blogger and submiting to webmaster

http://blogtimenow.com/blogging/create-blogger-sitemap/

A Sitemap is nothing but a list of accessible pages in your website. Sitemaps helps search engines like Google, Yahoo and Bing to easily crawl pages in your site which helps in better index. As a blogger you must create a sitemap so whenever you make a new post search engines can crawl and index them easily. In this post let’s see how to create sitemap for Blogger blog and submitting it to Google webmaster tools and in robots.txt. Default Blogger sitemap


By default your blogger blog will have sitemap, but the issue with that sitemap is it only shows your recent blog posts (example). A perfect sitemap is that it should contain the list of all you pages so that search engines know the complete structure of your site. Let’s see how to create sitemap for Blogger blog. How to create sitemap for Blogger

Creating sitemap is very simple and this sitemap works for both self-hosted Blogger blogs and normal Blogger blogs. Just use this (atom.xml?redirect=false&start-index=1&max-results=500)next to your blogs URL. See example below.

http://yourblogname.blogspot.com/atom.xml?redirect=false&start-index=1&max-results=500

Now you have created sitemap for your Blogger blog, but you need to tell search engines about your sitemap so that bots can know your site structure. There are two ways to tell search engines about your sitemap.

1. Showing your sitemap in robots.txt file and 2. Submitting your sitemaps in Google webmaster tools Adding your Blogger sitemap in robots.txt file

Login to your Blogger blog and go to dashboard >> settings >> search preferences and edit the custom robots.txt. Enable and paste the following text and click save changes. Make sure to change your blog name in Blogger sitemap below.

How to create sitemap for Blogger - Blogger sitemap XML


So whenever search engines crawls your site they will access your Blogger sitemap from robots.txt file.
Submitting your Blogger sitemap in Google webmaster tools

Login to your Google webmaster tools and select you website. In your site dashboard click sitemaps below. Now click add/test sitemaps, add your sitemap (just the atom.xml?redirect=false&start-index=1&max-results=500) and submit your sitemap.
That’s it you have successfully submitted your sitemap in Google webmaster tools. Now it’s ready for crawling and indexing. You can find the number of pages crawled and indexed in Google webmaster tools.

Hope this helped you on how to create sitemap for Blogger and submitting it in robots.txt and Google webmaster tools. Please leave your comments below.
How to create sitemap in Blogger blog
Blogger sitemap - Submitting sitemap in Google webmaster tools
If you like then also submit your Bloggers sitemap to Bing webmaster tools.